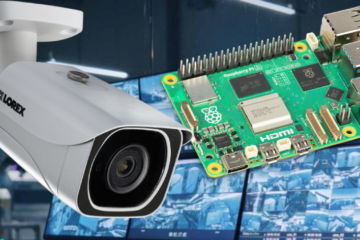
The purpose of this project was to create a portable security camera with a live feed that can be accessed from any device connected to the same network.
The project, when finished, only requires:
the raspberry pi, a power supply, a raspberry pi camera module, and a WIFI dongle.
I used several tutorials in my journey to create this project, but this one was certainly the most helpful:
https://www.instructables.com/Raspberry-Pi-as-low-cost-HD-surveillance-camera/
This blog inspired me to do this project, and it contains all the information someone needs to do what I did, and then some. However, it doesn’t go into detail with all of the steps, which is what caused me to have difficulty finishing the project with the time I had. For example, the blog tells you to download the software, PuTTY, so you can access your raspberry pi wirelessly, and it helpfully provides a link to PuTTY’s website, but it doesn’t explain in any way how to download and use PuTTY, so I had to search the internet for a specific tutorial, provided below:
https://linuxhint.com/use-putty-to-access-raspberry-pi-terminal-pc/
Another problem with the first blog is that it tells you to use the raspberry pi camera module, but it doesn’t specify that you can’t use a USB camera, so I tried to use a USB camera. This mistake was the biggest time sink for me, because I tried for days to find a tutorial that worked for my USB camera and I had to go back to Delta College and get the Camera Module to finish my project before the semester ended.
Don’t make the same mistake I did. Get the officially supported camera module, because it is officially supported and pretty much guaranteed to work.
This blog was discovered after I tried and failed to get the USB web camera to work.
https://www.sigmdel.ca/michel/ha/rpi/streaming_en.html
The blog talks about the exact same USB camera I was using, and it explains exactly how to get a webcam stream running, but the blog also explains that the methods it uses might become deprecated sooner than later, and since the blog was last updated in 2021, I decided not to waste my time and gave up with the USB camera. If I had more time, I might have followed this tutorial just to see if it worked, and that would have opened a door to me using multiple USB web cameras with the raspberry pi, since the raspberry pi has multiple USB slots, and only one camera module slot.
This blog is the one that I ultimately used to get my Raspberry Pi camera module working.
https://pimylifeup.com/raspberry-pi-webcam-server/
The blog was actually first created for USB web cameras, but was updated on January 23, 2023, explaining that the method still works for the dedicated camera module but no longer works for USB web cameras, and that it would be updated as soon as a solution for USB cameras was found. This further solidified my decision to ditch the USB webcam and get the dedicated camera module.
Unfortunately, it seems that most raspberry pi projects which aren’t officially supported become deprecated, and the people who try to do these projects don’t know until they try running sudo code to install software, and get errors.

Powered by a portable power supply, this project is free from any other wired connections. There is a camera module that connects to the top of the motherboard and fits into a slot on the case. A wifi module connects the Raspberry Pi to the same network my desktop computer is connected to, so that I can safely and privately access the camera’s live feed.
All I have to do to access the Raspberry Pi is log into it from my computer, using PuTTY software. This allows me to make changes to configuration files and install software quickly by copying and pasting sudo code from my computer into the emulated console instead of typing sudo code into the raspberry pi’s console manually with the wireless keyboard. I still have the wireless keyboard connected to the PI in case I need to use Raspbian’s Desktop. Raspbian is the default Operating System for Raspberry Pi.
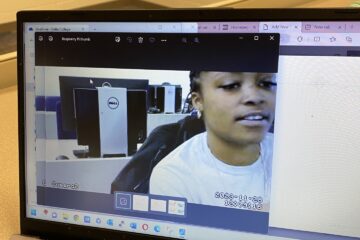
Accessing the live feed is straightforward. You type a command in the raspberry pi’s console to find the Raspberry Pi’s network address, then type this address into your desktop computer’s address bar. This alone does nothing, though. You still need to add a port to the end of this address, which is created after you install the Motion software onto your Raspberry Pi. By default, the port is 8080, but you can customize it in Motion’s configuration file. Once you have this port, you can type the full address, ex(123.123.1.12:8080) and will be taken to a page that displays your camera’s live feed.
For fun, I pointed my camera at the page displaying the live feed so that it would display a live feed of a live feed displaying a live feed, and so on.


0 Comments