Deciding on which Raspberry Pi project I was going to do was relatively easy for me. I figured I would go with the RetroPie, simply because old video games make me feel nostalgic and bring back memories of a time when my only struggles in life were doing chores and having a bedtime. Another reason I choose this project was that I knew it wouldn’t take me long and I wanted to tinker with the Raspberry Pi beyond just putting some old games on it.
Games may be entertaining, but I really wanted to do something more “techy” or “nerdy”. So I decided to add the capability of cloning to my Raspberry Pi. It took quite a bit of research, but in the end, I was able to do it.
Before I start getting into everything, here is a list of everything that I used in my project.
- Physical things needed
- Raspberry Pi kit
- USB (Preferably one with a light that blinks when it’s doing work.)
- A computer
- A game controller (I used an Xbox One controller.)
- A cable for the controller
- Resources used RetroPie (Videos/Links/Software)
- Resources used for Cloning
RetroPie Overview

Setting up the RetroPie wasn’t a very difficult task. It really just came to following the instructions that are provided on the RetroPie GitHub site. The hardest part of this project is probably finding the games themselves. I had to be careful not to install the wrong things because some of the sites seemed sketchy.
The capabilities of the RetroPie are pretty straightforward. I simply had to set up my controller and I could start playing any games that I added to the device.
Here is a clip of me being trash at Mortal Combat. Enjoy me being absolutely destroyed. I took out the audio and replaced it with some free music just in case I’m not allowed to use the Mortal Combat audio.
That’s about all there is to the RetroPie project. One problem that I ran into was with my USB stick. Since my USB device didn’t have any lights on it I had no way of telling when it was done transferring things to my RetroPie. This kept causing my USB device to corrupt and I had to repair it a couple of times. To anybody wanting to do this project I would recommend a USB with a light.
Cloning Overview
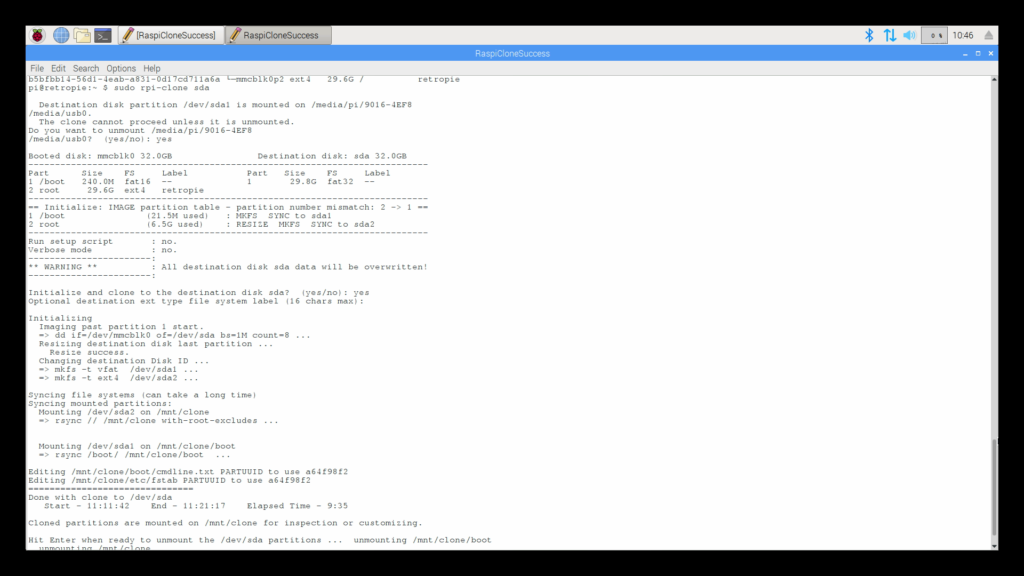
I’m not going to get into all of the pain that I went through to get the cloning to work, but I did provide all of the links that I need to get this working. Cloning allows you to take one storage device and make an exact copy of that device and put it onto another storage device. I tested this out by cloning my RetroPie to another SD card and then using the cloned SD card to boot up my RetroPie.
Here is a picture of the pixel desktop that I put onto my RetroPie. I needed this to get the cloning to work.

After I got everything for cloning set up on Pixel, it wasn’t too hard to create a clone. Here is how the process works.
- Connect an external storage device to the Raspberry Pi. (USB, External HDD, SD card)
- Open up the terminal in Pixel
- Type the command: “sudo rpi-clone sda” (sda is the destination storage device that I want to clone to).
- It will ask if you want to unmount the storage device. Type: yes
- Then it will ask if you want to initialize the clone. Type: yes
- After it’s done you have to press “enter” once and that’s it.
Here’s what it will look like in there terminal.
Setting up Cloning was definitely harder that setting up the RetroPie, but that’s only because I had to do some research to get it working. If I was to do it again already having the links that I provided, this process would be a lot easier.
In the end, I technically did two projects. What I loved most about the RetroPie was the ability to build beyond the scope of the project. What started out as a way to play some old games, turned into a test of my troubleshooting skills. I’m just one of those people who love a good challenge. I didn’t even know if it was possible to clone on the RetroPie. All I did was look it up and I found someone who had wrote a script for it. So my advice for anyone wanting to do the RetroPie is, if you think of something that you want on the RetroPie, just Google it. Chances are that somebody has already done it before.

0 Comments