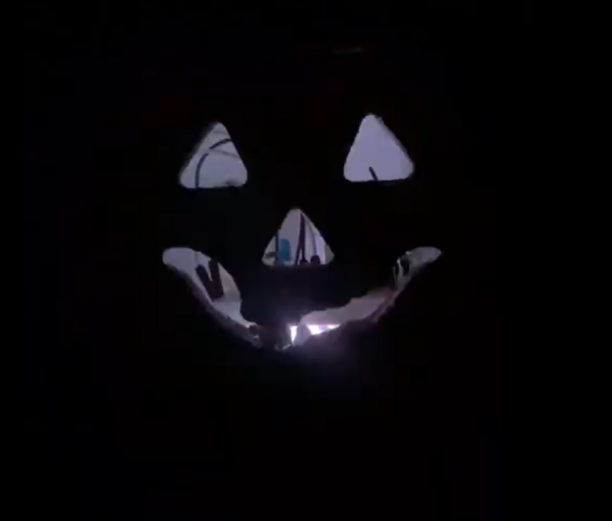
Kaileigh’s Pumpkin Pi picture
My goal was to make my raspberry Pi kit be used as a lighted device in my pumpkin. I wanted to create some sort of a light show for the inside of my pumpkin. My project was a success! One of my favorite movies to watch around the holidays is the Adams Family movie. I wanted to create a way for my “lightshow” to go by the theme song of this movie. Growing up one of our traditions every year for Christmas is to go to the Nicol’s Christmas Light Extravaganza. They have a Christmas light show that goes along with its own radio station. I wanted to create something similar, but for Halloween.
After deciding what I wanted to do for my project. Researching it for 2-3 days and finally figuring out what materials I needed I made a plan to go to Delta College to get my materials. That was where I hit my first road bump. They stated that I could not have the materials I was asking for because they were meant for an electrical class and I was in a computer class. They insisted that I try a different project and gave me the go Pi go kit to check out. I checked it out and took it home and did not think that it would be as fun for me.
I love lights that was why I picked the lightshow Pi project. So after doing some googling, I found a kit online from amazon that came with the pieces that I needed and it was comfortable for my budget on the project. I was willinging to spend some money on this because I had never done anything like this before. I figured it would be fun.
Now for me this was hard. I know it was listed as a medium to easy project but from going to not knowing what the wires were to not being fluent in these terms is a big deal to me. It took me 9 days to get this done once all my pieces were delivered. I messed up by connecting the wrong wires a couple times. I broke 3 LED lights, Got really frustrated but continued to try again.
After taking time to search more about each piece and getting rid of the fear of shocking myself or electrocuting myself, I was able to complete this project. When I first heard we were doing this, all I could think of was that I was going to fail. Now I have a really cool Halloween decoration. I even ordered a raspberry Pi kit from amazon so when I have some rainy days off I can play around with more projects. My next goal is to go a little more advanced and do something with a camera and the Pi kit.
Materials List:
- Raspberry Pi kit
- Breadboard
- Male to male wires
- Jumper wires
- LED lights (5)
- Buzzer (not needed but wanted to add something extra to see if it would work)
- Pumpkin
- Phone to record
- Power source
- Connector cord for power source to raspberry pi
Steps:
- Took my Pi out of the case
- Layed out all my materials on my workspace
- Make sure the Pi is turned off before using it at all.
- Hook up the female side of the first wire to the bottom pin.
- Then hook up a different female end two pins over from the first. (leaving on pin in between)
- Hooked up wires to the breadboard.
- The live wire goes into any slot on the positive side. (red side on my breadboard)
- Plug the other wire into any slot on the negative side. (Blue side)
- Grab male to male jumper wires and plug one in one the negative rail and one on the positive rail.
- Get resistors and LED lights ready.
- I used a 100 OHMS resistor.
- Resistor goes into the negative (blue) rail. Plug in the other side anywhere else on the board.
- Using the LED, put the shorter side into the positive side, lined up directly with the resistor, and the longer side bent anywhere else on the board.
- Then take the other end of the jumper wire and line it up with the longer side of the LED light. ( the one that we put anywhere)
- Plug in the raspberry Pi
- WE HAVE LIGHT
- I repeated steps 12-16 multiple times, adding multiple different LED’s so that I could have more color and more color options. This also made it brighter.
Works Cited:
Google Search, Google, www.google.com/search?q=how+to+hook+a+breadboard+up+to+a+raspberry+pi+4&rlz=1C1CHBF_enUS915US915&oq=how+to+hook+a+breadboard+up+to+a+raspberry+pi+4&aqs=chrome..69i57.17264j0j7&sourceid=chrome&ie=UTF-8#kpvalbx=_q51fYdncH8-7qtsPg7yloAE24.
Pumpkin Pi, begillespie.github.io/Pumpkin_Pi/.
Cawley, Christian, and Christian Cawley
(1524 Articles Published)
Deputy Editor for Security. “10 Amazing Halloween Props You Can Make with a Raspberry Pi.” MUO, 25 Sept. 2017, www.makeuseof.com/tag/7-amazing-halloween-props-can-make-raspberry-pi/.
Sadmin, et al. “How to Build a Pumpkin Pi – The Rogue AP & MITM Framework That Fits in Your Pocket.” WonderHowTo, WonderHowTo, 3 Apr. 2019,


0 Comments