Why I Chose RetroPie?
There are a few reasons why I decided to go with the RetroPie project. I’m a fan of video games and when looking through all the options I had for the Raspberry Pi project this one caught my eye. I never got to play a lot of the retro games that people say are so great and this project gave me the chance to play some of them. On top of all this I had a friend who loved the old Sonic games and he’s wanted to play some other retro games as well so he said he would help me.
How I Got Started
For this project I knew that there were some things that I would need to be able to get it all set up and those include:
- A Raspberry Pi.
- A Power Cable for the Raspberry Pi.
- A Micro USB and the Micro USB Reader for it.
- Although the On and Off switch isn’t technically necessary, it is very helpful.
- You need a T.V. or Monitor.
- The HDMI Cable to display the Raspberry Pi.
- I used a flash drive, but I do not think it is entirely necessary, but it makes the process easier.
- An Ethernet Cable is what I used to connect my Raspberry Pi to the internet to download files through RetroPie.
- Lastly is a Controller and the USB Cable for it.
Setting everything up was much easier when following this video:
It is mentioned in the video but to install the imager for RetroPie I used this website: https://www.raspberrypi.com/software/. It was a very easy process and only took me a little bit of time to get it all set up and working.
How It All Works
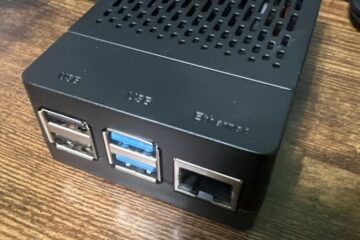
After plugging everything in and setting it all up this what my Raspberry Pi looked like:

You can see in the image (from left to right) there is the power cable, HDMI cable, ethernet cable, flash drive, and below the flash drive is the cable that connects the controller. The on and off switch is connected to the power cable so when everything is hooked up you can turn it on and with operating system installed on the micro-USB it should work. You can easily find games online by just searching for them. In this case the type of game is called a “rom”. Once you have the roms on your Raspberry Pi you should be able to find the games on the home screen shown here:

After that you can play your games! As you can see here, I have a picture of my friend playing Sonic 3 and Knuckles

The Outcome of the Project
I had a lot of funny with the project, even with the small roadblocks along the way. It was fun, not only playing the games myself, but also my friend geeking out at the retro games he found and wanted to play. Since the Raspberry Pis that we were given aren’t the best it can’t run a lot of the higher end retro games but games like Sonic, Earthbound, and other similar 2d games ran perfectly fine. I think retrying the project with better equipment would be fun since you would be able to run a wider variety of games. I don’t know the extent of the newer versions of the Raspberry Pi, but it would be cool to see. Overall, it’s an easy and fun project for those who are interested in retro games and it’s a great start for someone who’s getting into Raspberry Pis as a whole.
0 Comments